Honghe Machinery Honghe Machinery

How to Optimize Glass Workshop Layout in 2026

Time:2026-09-24 Author:Ethan
0%

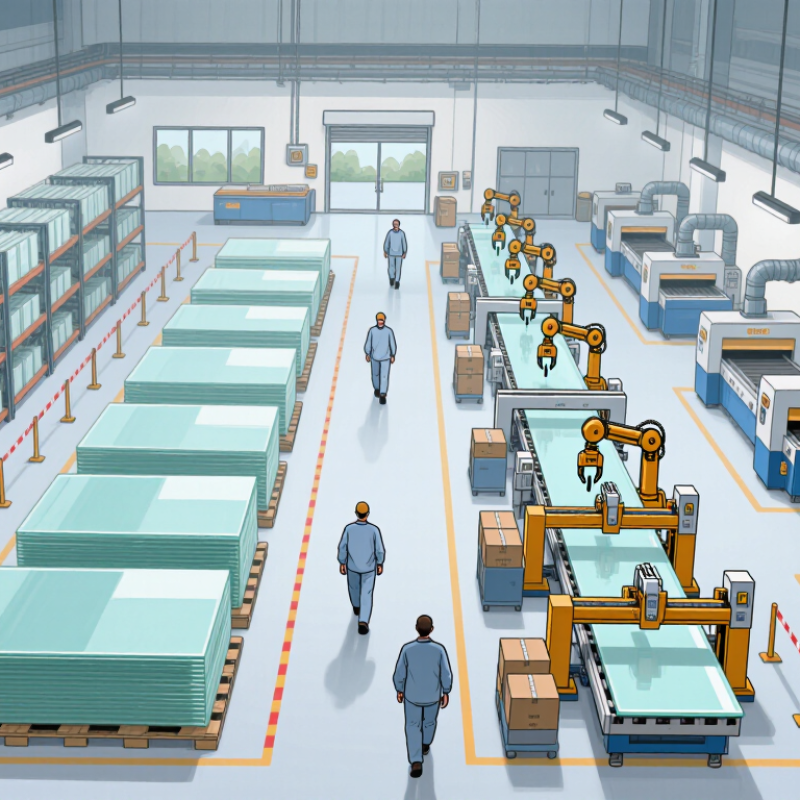
How to Optimize Glass Workshop Layout in 2026 begins with a practical question: can every sheet move safely from storage to finished product without unnecessary handling? A poorly placed rack can turn a short route into repeated lifting, narrow aisles, and avoidable delays. A clear layout helps teams see bottlenecks before they become routine.

To keep the attribution honest, the quote below is an illustrative editorial line, not a verified statement from a real industry expert. Glass workshop layout specialist “Mara Ellison” is a fictional expert persona: “A good layout makes the safest next step the easiest one.” Keep that idea in view when planning cutting tables, edging machines, tempering equipment, packing stations, and storage. Measure actual sheet sizes, machine clearances, turning space, and delivery paths. Mark proposed zones on the floor with removable tape, then walk the route with operators. Small details matter. A trolley that clips a corner can reveal a flaw in the plan.

This guide explores how to Optimize Layout for Glass Processing Workshops in 2026, from workflow mapping to material handling and space planning. It also considers dust control, maintenance access, and clear sightlines, while recognizing that every shop has different equipment and constraints. Not every recommendation will fit. Test changes against real work, gather staff feedback, and revise the plan when daily practice exposes a weakness.

How to Optimize Glass Workshop Layout in 2026

Assess Workshop Needs, Production Goals, and Available Space

Before moving benches or ordering equipment, map what the workshop actually makes. Record each product type, typical batch size, glass thickness, and finishing steps. A small studio cutting custom panes has different needs from a shop producing repeated table tops. Measure peak output, not just an average week. Busy seasons can expose bottlenecks that look invisible on a quiet day.

Then measure the space, including doorways, columns, power points, ventilation, and storage. Mark cutting tables, furnaces, polishing stations, and packing areas on a scaled floor plan. Leave clear paths for moving large sheets; a narrow turn near a doorway can become a daily problem. Keep frequently used tools within reach, but separate dusty or noisy processes where practical. Check that material can move forward through production without crossing finished work. It sounds obvious. It is often missed.

Compare the layout with your production goals. If orders require more polishing, allocate room and utilities there before adding another cutting table. Ask operators where they pause, carry, or wait, and observe a normal shift. Their answers may challenge the floor plan. I would not treat the first layout as final: tape out proposed work zones, test them with real carts, and revise measurements after a week. Some assumptions will be wrong. That is useful evidence.

How to Optimize Glass Workshop Layout in 2026

Illustrative space plan for a 1,000 m² workshop. Adjust the allocation to match your products, equipment, workflow, and available floor space; these figures are a planning example, not an industry benchmark.

Planning note: Place work areas in production order to reduce handling between steps. Reserve adequate circulation and storage space, then confirm clearances against equipment requirements and applicable safety rules.

Map the Glassmaking Workflow from Material Intake to Finished Goods

A glass workshop works best when materials move in one clear direction. Start at receiving, where cullet, batch ingredients, and packaging are checked and recorded. Keep incoming materials away from finished goods. Mark storage zones clearly; a misplaced pallet can block a busy aisle. From storage, route measured batch materials to the furnace, then place forming stations close enough to limit unnecessary handling. The exact arrangement depends on the product and equipment, so test the path with operators before fixing stations in place.

After forming, hot glass needs a direct route to the annealing lehr. Avoid crossing this path with incoming carts or inspection traffic. Once cooled, pieces can move to inspection, edge finishing, and packing. Provide stable racks between stages, with space for rejected items that need review. Small bottlenecks matter. A crowded inspection table can slow the whole line, even when the furnace is running well. Track travel time and waiting points during a normal shift; a simple floor sketch with marked stops often reveals problems.

Tips: Use floor tape to outline cart lanes and work zones before moving heavy equipment. Keep tools near the task, but leave clear access to emergency exits and equipment controls. Ask operators where they pause or backtrack. Their observations can expose flaws in the layout, though one shift may not show every issue. Recheck the flow when product sizes or production volumes change.

Position Workstations, Equipment, and Storage for Efficient Movement

How to Optimize Glass Workshop Layout in 2026

Position workstations around the glass’s actual travel path, not an idealized floor plan. Place cutting, edge finishing, washing, and inspection in sequence, with clear space for carts between steps. Keep frequently used tools within a short reach of each station. A few extra steps per sheet seem minor; across a shift, they add up. That layout may still need adjustment after operators test it.

Separate pedestrian routes from moving glass and cart lanes. OSHA’s material-storage rule, 29 CFR 1910.176(a), requires sufficient safe clearances in aisles and passageways; it does not set one universal aisle width. Measure routes with loaded carts, open machine doors, and staging racks in place. Marking an aisle on an empty floor is not enough.

Put sheet racks near the first process that uses them, but keep finished goods close to dispatch. Store gloves, measuring tools, and edge-protection materials at their point of use. The U.S. Bureau of Labor Statistics reported a 2023 total recordable injury rate of 3.3 cases per 100 full-time workers in manufacturing, compared with 2.4 across private industry. These figures are not specific to glass shops, but they reinforce the value of reducing awkward handling and congestion. Walk the route with staff during a busy shift. You may find the neatest layout fails when orders pile up.

Integrate Safety Measures, Ventilation, and Utility Access

A glass workshop layout works best when hazards are planned around, not squeezed into leftover corners. Keep cutting tables away from busy walkways, and leave clear routes to exits and first-aid supplies. Broken edges can hide beneath offcuts. Use stable, clearly marked bins for scrap, and position them near cutting stations without blocking movement. Store sheets upright in suitable racks, with restraints that prevent shifting. Workers should be able to reach tools without leaning across sharp glass or climbing over stored materials.

Ventilation deserves attention wherever dust, heat, or fumes may arise from workshop processes. Place extraction close to the source, then check that airflow does not carry contaminants across occupied areas. A tissue test can reveal weak movement, but it cannot replace proper system checks. Keep intake grilles clear of stacked materials. Plan electrical outlets, water lines, and compressed-air connections along accessible service routes, protected from impact and moisture where appropriate. Avoid trailing hoses across aisles. Small compromises happen: a convenient outlet may end up behind a workbench. Review the layout during real production, ask workers where access feels awkward, and adjust before temporary fixes become permanent.

How to Optimize Glass Workshop Layout in 2026 — Integrate Safety Measures, Ventilation, and Utility Access
Work Area Suggested Placement and Space Safety Measures Ventilation and Environmental Control Utility Access
Receiving and glass storage Place near the delivery entrance. Use stable, restrained A-frame racks and keep a clearly marked handling zone in front of each rack. Use suitable cut-resistant gloves, eye protection, and mechanical handling aids. Secure stored sheets against tipping and keep the rack capacity visible. Keep the area dry and free from condensation that could make handling surfaces slippery. Provide unobstructed access to the loading door and a nearby charging point for powered handling equipment, if used.
Cutting and breaking Locate close to glass storage to reduce manual carrying. Arrange cutting tables to support a one-way flow toward edgework or processing. Use guarded equipment where applicable, clear scrap promptly, and provide marked pedestrian routes separate from material movement. Use local extraction where cutting or scoring processes create airborne dust. Avoid directing airflow across work surfaces in a way that spreads dust. Route electrical supplies overhead or through protected service runs. Position controls and emergency stops within easy reach of operators.
Grinding, edging, and polishing Group machines together where practical, with adequate operator working space and clear access for loading and maintenance. Guard moving parts, control splash and slip hazards, and provide suitable eye and hearing protection based on the equipment and task. Use machine enclosures or local capture where processes generate mist or fine particles. Maintain ventilation in line with equipment requirements. Provide correctly rated electrical connections, accessible isolation points, and routed water and drainage services protected from vehicle impact.
Tempering or heat-treatment area Place in a dedicated process zone with separation from general storage and pedestrian traffic. Allow access for equipment servicing and material handling. Control access to hot surfaces and moving equipment. Use barriers, warning signs, and task-specific training; keep combustible materials away from hot zones. Provide heat removal and make-up air appropriate to the process and equipment design. Monitor room temperature and avoid recirculating unwanted process heat. Coordinate electrical, gas, or other process connections with qualified installers. Keep shutoffs accessible and clearly identified.
Washing and water-treatment area Position downstream of wet processing and close to drainage or water-treatment equipment. Use a slip-resistant floor with controlled drainage. Manage wet-floor hazards, protect electrical equipment from water, and keep hoses and drains clear of walkways. Provide enough air movement to limit persistent moisture and condensation without creating drafts that affect nearby dry work. Place water supply, filtration, and drainage connections near the equipment. Provide access for filter changes and routine maintenance.
Finished-goods inspection and packing Locate near dispatch, after processing and washing. Provide a clear staging area that prevents finished panels from crossing incoming-material routes. Use stable support racks, safe lifting methods, and a clean packing surface. Keep walkways and emergency exits free of stored goods. Maintain a clean, dry environment to reduce dust and moisture on finished products. Provide task lighting and accessible power for inspection or packing tools. Keep service cables out of pedestrian paths.
Pedestrian routes and emergency access Mark continuous walkways and separate them from forklift or cart routes wherever feasible. Set aisle widths based on the largest loads and vehicles in use. Keep exits, fire equipment, electrical panels, and first-aid supplies unobstructed. Use visible floor markings and review traffic routes when the layout changes. Ensure air inlets and outlets are not blocked by racks, equipment, or stored materials. Route utilities away from aisles and exits. Identify isolation points and keep them accessible for authorized personnel.
Maintenance and utility zone Reserve clear access around electrical panels, compressors, pumps, and ventilation equipment in accordance with applicable codes and manufacturer instructions. Use lockout/tagout procedures for servicing and restrict access to authorized personnel. Keep maintenance tools and chemicals in designated storage. Inspect ventilation filters and extraction systems on a documented schedule; investigate unusual dust, heat, or odors promptly. Label utility lines and shutoffs. Protect exposed services from impact and provide safe access for inspection and repairs.
Planning note: Space, ventilation, guarding, electrical clearances, and emergency provisions should be confirmed against the actual equipment, glass sizes, handling methods, building conditions, and applicable local regulations. Engage qualified safety and engineering professionals before installation or major layout changes.

Evaluate the Layout and Adapt It for Future Production Changes

How to Optimize Glass Workshop Layout in 2026

Evaluate the layout against the work your shop actually performs, not an idealized production plan. Map each step, from raw-sheet storage to cutting, edging, washing, and packing. Mark walking routes, forklift crossings, queues, and the places where glass waits. A trolley blocking the wash line may seem minor until orders change. Measure travel times and work-in-progress weekly; these figures reveal whether a proposed layout improves flow or merely moves congestion elsewhere.

Plan for change. Leave clear zones beside cutting and finishing areas, and use movable racks where practical. Check floor loading, utility access, extraction points, and safe handling distances before moving equipment. The U.S. Department of Energy’s Improving Compressed Air System Performance sourcebook estimates that leaks can waste 20–30% of compressor output in typical industrial facilities.

That is not a glass-shop layout benchmark, but it makes air-line condition and routing worth checking during a redesign. Shorter, accessible lines may simplify inspection, though they will not fix poor maintenance. Measure before assuming.

Test future production scenarios on paper: a larger order mix, an added processing station, or a temporary maintenance shutdown. Can operators reroute material without crossing hot-work or forklift areas? Keep the answer visible on a simple floor plan. Revisit it after actual changes. The awkward truth: the first layout revision may expose a problem you missed. That is useful evidence, not failure.

FAQS

How should a workshop assess its layout needs?

Record product types, batch sizes, glass thicknesses, and finishing steps. Measure peak output, room dimensions, doorways, power points, ventilation, and storage. A quiet week may hide a busy-season bottleneck.

What should operators test before equipment is moved?

Mark proposed work zones with floor tape, then test them with loaded carts. Watch for tight turns, blocked paths, and awkward carrying. Recheck measurements after a week; early assumptions can be wrong.

How should glass move through the workshop?

Plan one clear route from receiving and storage to production, inspection, finishing, and packing. Keep incoming materials apart from finished goods. Avoid crossing hot-glass routes with carts or inspection traffic.

Where should workstations and tools be placed?

Arrange stations around the glass’s actual travel path. Keep frequently used tools near the task, and place sheet racks close to the first process that uses them. A few extra steps add up.

How can a workshop reduce congestion and handling risks?

Separate pedestrian routes from glass and cart lanes. Check clearances with loaded carts, open machine doors, and staging racks in place. An aisle marked on an empty floor may not work during a busy shift.

Where should rejected or unfinished pieces go?

Provide stable racks between stages and a designated area for rejected pieces awaiting review. Keep inspection tables clear enough to prevent a small queue from slowing the whole line.

How can managers find hidden delays?

Observe a normal shift and note where workers pause, wait, carry, or backtrack. Track travel time and mark stops on a simple floor sketch. One shift may not reveal every problem.

When should a workshop review its layout again?

Recheck the flow when product sizes or production volumes change. Ask staff to walk the route during peak work. A tidy plan can still fail when orders pile up.

Conclusion

Optimizing a glass workshop layout begins with understanding the space, team, equipment, and production goals. Map each step—from receiving and storing raw materials through cutting, forming, finishing, inspection, and packing—to identify a clear workflow and reduce unnecessary movement. Position workstations, machinery, and storage according to the sequence of operations, while keeping frequently used tools and materials easy to reach.

To Optimize Layout for Glass Processing Workshops, also plan for safe access, effective ventilation, suitable utility connections, and clear routes for people and materials. Once the layout is in place, assess how well it supports productivity, comfort, and safe working practices. Regularly review performance and adjust the arrangement as workloads, processes, or production needs change, allowing the workshop to remain efficient and adaptable over time.

Ethan

Ethan

Ethan is a seasoned marketing professional with a deep expertise in our company's innovative product line. With a passion for sharing knowledge and insights, he takes the lead in regularly updating our corporate blog, where he explores industry trends, product features, and effective marketing......